Labels

Monday, July 29, 2024

Weekly Progress & Plan

This is my weekly progress for the documentary project. This progress report will allow me to evaluate and reflect what I did as well as what I could improve throughout the weeks. I also made a plan as a reminder on what tasks I should complete according to plan.

WeekStart DateTaskBlogpost TitleContentDeadline
W1
22 July
W2
29 July
Pre Production
Research
1BriefDescription of the brief, embed powerpointW2
2Plan & Weekly ProgressPlan for the whole project, Weekly diaryW2
3TeamYour team + Links ot their blogsW2
4ResearchResearch into documentary openings of the same genreW4
W3
5 August
Plan
5Statement of IntentPlan for the productW4
6StoryboardScene by scene storyboardW5
7Location Scout & Risk AssessmentPossible shooting locations, risk assessment tableW5
W4
12 August
W5
19 August
Production
Produce
8Behind the ScenesImages of the shootW8
9Social Media (Research & Development)Research into similar social media pages. Development of own ideas.W9
10Thumbnail (Research & Development)Research into similar thumbnails. Development of own ideas.W9
W6
26 August
W7
2 September
Post Production
Edit/Reflection
10Editing ProcessHow did you edit? Challenges, solutionsW9
11Self ReflectionSelf Reflection EssayW9
W8
9 September
Edit
W9
16 September
Submission
12FinalFinal doc, social media page, thumbnailW9

⌕ Week 1 

This week the teacher explained us briefly regarding what are we going to learn throughout the term as well as the preview for the project that we are going to make. Furthermore, my teacher also explained about the timeframe of the lesson and the syllabus, this helped me to understand and expect the things that I will learn throughout the term and familiarise with it. 

⌕ Week 2 

During week 2, the teacher introduced us with the project brief. We have to create an intro of a crime documentary with a group, I feel so excited to plan and start making the project, hoping me and my group will be able to finish them on time with satisfactory result. Next, we viewed and researched several crime documentaries to analyse the similar conventions that they have. This helped me a lot especially for brainstorming my crime documentary ideas as I have the knowledge needed on what a crime documentary should have look like. I have also learned the importance of technical elements usage (camera, mise-en-scene, sound & edit) in a crime documentary to generate suspense and target their intended audience. 

⌕ Week 3 

In week 3, me and my group started on brainstorming ideas on our crime documentary project. Each of us proposed any ideas in mind individually in a word document, then we discussed our final ideas together. We do this to ensure that everyone has part to give their opinions to be heard and seen, enhancing our collaboration and communication skills. We then move on to developing our statement of intent for our project to determine the plot or story of our crime documentary as well as our suitable target audience. For next week, we planned to start searching for cast members who are interested to play the characters role for our video project, as well as conducting location scouting. 

⌕ Week 4 

In week 4, there was a day where the teacher was absent. We were instructed to starting working on our script writing, location scout and storyboard. Me and my group have divided tasks on who do in which me and Audrey will be working on the storyboard, location scout by Kalista and Rara and we will do our script together in a collaborative document. We are still unsure on who to cast for the roles, hence we still need more time to decide. The characters in our crime documentary plot have lots of bond and will spend a lot of time together on and off screen, so we also need to make sure that the people we cast have strong chemistry to avoid awkward situations during filming.

⌕ Week 5 

During week 5, we continued finishing the location scout and risk assessment, finalising the whole script as well as starting to create the storyboard for some scenes. Since we've already made a filming schedule beforehand it saves us much time in class, not needing to create a new one as we already have everything planned out. We also started on shooting the interrogation scene this Friday after school in an empty classroom; it took a little more time than expected but everything went smoothly. For theory lesson, the class watched a crime documentary called, "Ice Cold: Murder, Coffee and Jessica Wong) to identify the representation used. This enables me and my group to represent and portraying our intended characters accurately. The teacher also showed us crime documentaries spoofs that we could use as an inspiration. Our to-do next week is to continue shooting other scenes, especially the beach scene on Saturday. 

⌕ Week 6 

This week the teacher introduced us to the critical reflection. Compared to last year's component 1 project, this reflection is relatively different in terms of questions needing to be answered, and it also requires to be written in an essay format instead of creative presentation, which I found more challenging because I tend to communicate better with visuals. Still, I'll give it my best shot. Then, he gave us a plan outline for us to fill in so that it would be easier for us to write the important main points that are needed. Although each member of the group must do their own reflection, my group and I decided to compile our main ideas onto a single document and then write the critical reflection together to make the writing process easier.

⌕ Week 7 

During week 7, we started on editing the crime documentary by using the application called Capcut from our laptops. While doing this throughout the subject session, we encountered  a major problem. Collaborative editing can only invite up to 1 person so my other teammates couldn't edit on the same page. My teammate whom I invited first, tried on editing in this file, unfortunately it doesn't sync well with mine. Hence, our solution is for me to edit the main video while the others will continuously give me input and suggestions, we will do this through face-to-face or through online zoom. Specifically for the CCTV footage (which needs a filter), my teammates will edit the clip then I will add them together in the same editing file at the end. We have to finish everything by next Friday thus it is important for us to manage our time well for our crime documentary final video, thumbnail, reflection as well as the whole blog to be finished and submitted on time.

⌕ Week 8 

For our final week, my group and I concentrated on completing our behind-the-scenes, editing, thumbnail research & development, and - above - all - the most time consuming task, the critical reflection. Time management has grown in importance since it is important for us to complete everything on time but also producing quality work at the same time. Another burden that I had to endure myself is to finish my research, especially when I have my own additional research that I need to analyse individually as well, therefore I must work on that quickly. To overcome this, I had to spare most of my free time finishing my media work as well as conducting a call with my teammates at home for inputs and suggestions on the editing. All in all, this week was busy and hectic but I'm glad I can finally managed to complete all of the tasks at hand.


┏━━━━━━━━━━━━━━━━━━━━━━━━•❃°•° Self reflection°•°❃ •━━━━━━━━━━━━━━━━━━━━━━━━━━┓

Creating a weekly progress and plan is immensely beneficial for me as it ensures that my progress throughout my pre-production, production and post production is on track and as a reminder on what tasks I should complete according to plan. For each week, I included what I've done, what problems I've encountered, solutions to overcome the problem, and what I needed to finish or do for the following week. Throughout the term, I discovered that making a weekly progress and plan and consistently filling them up every week has increased my accountability to complete tasks on time especially in a group and evaluating how well I performed in completing the project. I gradually came to understand how important this blog page is as it keeps an eye on everything I've done and what I should accomplish, especially when a deadline is approaching. Nevertheless, I would like to improve my weekly progress and plan next time by separating the to-do list (in bullet points or checklists) among the others so that it is easier for me to go back to it again without having to read everything from the beginning of the paragraph. 

┗━━━━━━━━━━━━━━━━━━━━━━━━━━━•   ❃°•°❀°•°❃   •━━━━━━━━━━━━━━━━━━━━━━━━━━━┛

Documentary Project Brief

 Here is the brief for my documentary project.


┏━━━━━━━━━━━━━━━━━━━━━━━━•❃°•° Self reflection°•°❃ •━━━━━━━━━━━━━━━━━━━━━━━━━━┓

By the time I've heard that we were going to create an opening for a crime documentary, I was ecstatic and super excited right away. As much as I enjoyed watching crime and thriller-related movies and shows, I didn't watch many related crime documentaries (only once in a while), so I think it would be an exciting challenge and experience for me to make my own and learn more about crime documentaries through my research and production. In addition, the teacher also told us that we would be designing the thumbnail and making an official social media page for the documentary, which thrilled me even more. There has been a change in requirements; instead of making a presentation like in previous ones, we now need to write a 600 word critical analysis for our work. In my opinion, the previous structure was preferable since it allowed me to express my creativity through my presentation design and the use of images to help me explain things visually. I hoped to produce a masterful writing with full detail and precision. Overall, I'm so hyped and extremely excited to be able to work on this project, but I'm also a little concerned about how well I'll be able to organise my time so that I can finish everything in one term (3 months only). Despite the fact that I'm aware that I will face many work and challenges in my way, particularly working in a group, I hope I can still enjoy the planning, developing as well as creating the project — and most importantly, have fun. Hence, I have set a goal for myself to use my time effectively and avoid procrastination so that I can finish everything on time, avoid pressure and achieve the best result at the end.

┗━━━━━━━━━━━━━━━━━━━━━━━━━━━•   ❃°•°❀°•°❃   •━━━━━━━━━━━━━━━━━━━━━━━━━━━┛

Sunday, February 18, 2024

𝐅𝐢𝐧𝐚𝐥 𝐌𝐚𝐠𝐚𝐳𝐢𝐧𝐞

Here are the images for my final magazine cover, contents page and double page spread (separate page file & flipbook). 

Front Cover

Contents Page 

Double Page Spread 


Additional Pages / Commercial


Canva

Flipbook

Flipbook link: https://heyzine.com/flip-book/8060629704.html 


In case the images won't load, I made a google drive link to access the magazine images easier: https://drive.google.com/drive/folders/1PYr86q-4GXWqJotV1Ov6fzWSgzH0_FrQ?usp=drive_link 

𝐂𝐫𝐢𝐭𝐢𝐜𝐚𝐥 𝐒𝐞𝐥𝐟 𝐑𝐞𝐟𝐥𝐞𝐜𝐭𝐢𝐨𝐧

 Here is my critical self reflection for my magazine project. 

Here is a link to the file in case the embedded file does not work: Critical Self-Reflection (click the text to view file)

Monday, January 29, 2024

𝐏𝐡𝐨𝐭𝐨𝐬𝐡𝐨𝐨𝐭

 Here is a compilation of pictures during my photoshoot.

┏━━━━━━━━━━━━━━━━━━━━━━━━•❃°•° Self reflection°•°❃ •━━━━━━━━━━━━━━━━━━━━━━━━━━┓

Creating this blog post allow me to know what to prepare beforehand so that during the photoshoot there is no need to require extra preparations. My sister (the model), has already agreed and has consent to become the model for my magazine. However, during the photoshoot day she was reluctant at first because I wanted to do the photoshoot in the morning due to better lighting. I cannot force her otherwise I won’t achieve the best result for the photo taken (such as poor expression due to the model being in a bad mood). Hence, I had to wait until the afternoon for her to be ready which means that I won’t be having many time to do extra shots if it’s necessary. Additionally, I needed more people for the hand holding phone prop, so I asked my other family members if they're willing to do so and they agreed. I was also afraid of the limited photography equipment because there isn't a professional camera around me, so I have to rely on using my phone and editing to improve the quality of the photos I capture. I was initially concerned and worried because I also ran into issues with the lighting quality during my first attempt, this is because I didn't use a flash. So, for my second try, I tried utilizing the flash and was relieved that it worked out better. Overall, I felt that this photo shoot was enjoyable, and both my model and I were having fun while capturing the shots.

┗━━━━━━━━━━━━━━━━━━━━━━━━━━━•   ❃°•°❀°•°❃   •━━━━━━━━━━━━━━━━━━━━━━━━━━━┛


PRE-PHOTOSHOOT

Face appearance 

Makeup time-lapse video file (click here to view) 

This is a quick time-lapse video of me doing my model's makeup. Given that my model is still quite young, I want to create a look that is simple, elegant and natural. In addition, because young teenage girls are my target audience, I want to create a sense of creativity but also maintaining innocence in my model for my target audience to be inspired by. 

Outfit 

Star baby tee + black & white plaid pants 


I deliberately chose this particular outfit style because I want to keep up with current trends in fashion that appeal to and engage younger teenage girls, particularly those in Generation Z. The choice of black and white may conveniently contrast with nearly any background, and I don't want any complex or overly brilliant colors in the clothing to make it more approachable and relatable to the viewer.

Props used 

I would like more than one phone to be utilized as a prop, where only hands and the phone camera are shown as if a paparazzi would take photographs using their cameras, because I want to create a paparazzi feeling for my front cover magazine. 

Furthermore, I experimented with several items for my model to hold or, such a polaroid camera and glasses. When my model is posing with them, I can utilize the polaroid camera to showcase her personality and add context to my images, which will make them more captivating. Initially, I wanted to use the black sunglasses that celebrities typically wear to avoid being photographed by paparazzi because they are too bright. However, I was unable to find that particular prop, so I tried using clear glasses that my model could wear and try different poses with. In the end, this worked out and turned out quite okay.


POST-PHOTOSHOOT

Below are the raw, unfiltered images I took during the photoshoot process for my magazine:

1st attempt without flash (car backseat)

2nd attempt with flash (car backseat)


Other medium / close up shots used 

Selfie shots


After the photoshoot session, I tried to evaluate the pictures and decide on which one I will most likely use for my magazine: 

Wednesday, January 24, 2024

𝐃𝐨𝐮𝐛𝐥𝐞 𝐏𝐚𝐠𝐞 𝐒𝐩𝐫𝐞𝐚𝐝 𝐑𝐞𝐬𝐞𝐚𝐫𝐜𝐡 & 𝐃𝐞𝐯𝐞𝐥𝐨𝐩𝐦𝐞𝐧𝐭

Here is my double page spread research & development layout. 


┏━━━━━━━━━━━━━━━━━━━━━━━•❃°•° Self reflection°•°❃ •━━━━━━━━━━━━━━━━━━━━━━━━━┓

Creating a double page spread was a huge challenge for me because I’m still not sure which type of layout to use after all the research I've done. The use of grids and borders took me a long time to adjust so I had to cut out some of the article contents in order to fit all in and make sure it doesn’t have too little or too much of text for the audience to read. I needed to experiment with many different possible layouts, color scheme, as well as the type of typeface and text alignment which would suit my magazine genre and theme. The negative space below the page was also really poor to my liking. Overall, I’m still not quite satisfied with the results of my double page spread due to the limited time I have and hopefully I can revise it as soon as possible. For my second attempt, I actively asked my friends and teachers for constant feedback and honest comments. By this, I am able to collect unbiased data and further improve my designs so that the final result will look appealing for both myself and the audience reading my double page spread article. Due to changing my layout do a more structured format, the use of  borders and margins has aided my designs to appear more professional and neat as the texts are aligned tidily.

┗━━━━━━━━━━━━━━━━━━━━━━━━━━━━•   ❃°•°❀°•°❃   •━━━━━━━━━━━━━━━━━━━━━━━━━━━━┛

Here is my research for my double page spread magazine: 

--------------------------------------------------------------------------------------------------------------------------------------------------------------------------------------------------
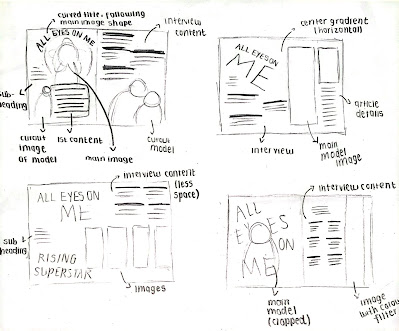
Draft sketch 
Below are the sketches for my possible double page spread layouts: 


--------------------------------------------------------------------------------------------------------------------------------------------------------------------------------------------------
Development 
After my research, I began developing my page: 

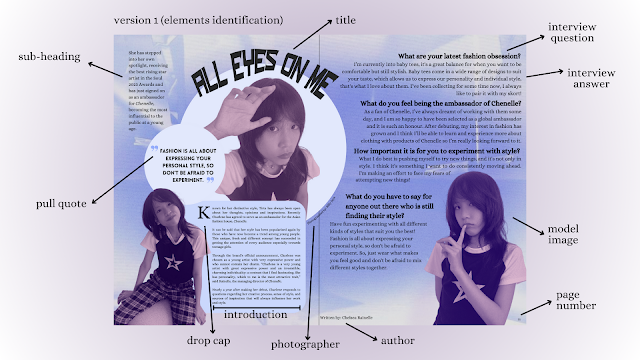
VERSION 1
Here is my attempt in removing the background of my main image:

Background used: 


After cropping out my model image and choose the background, I started on designing my double page spread


Double page spread version 1 analysis 

I am not satisfied and not confidence with the results of my first version of this magazine due to several reasons:

- Poor colour scheme, it makes the whole design look unprofessional
- The filter chosen for my model images made the whole page look dull 
- Article content are not justified and not following the margin and borders, which makes the position of the text messy
- Poor choice of typeface used, too many styles are used
- Overall looks really rushed

I will try to create another version of my double page spread, but this time I will pay more attention to the colours I will be using, borders & margins and the typeface choice. I decide to not add too many elements in the page so that it is easier to read.

════ ⋆★⋆ ════
VERSION 2


Final double page spread design:

════ ⋆★⋆ ════